

How To Repair Split Pedestals Table
Designers and engineers often need software to adapt, repair, and finalize 3D models for 3D printing. Luckily, the era of manual mesh programming is long gone.
Today, in that location is a range of dedicated tools available offer both automatic and transmission STL repair functions. Automatic wizards will suffice for near models and set small errors such every bit holes and loose shells, but models with more critical errors will require a standalone solution.
In this guide, we describe the workflow for repairing STL files and walk through the process with five of the best STL repair software tools for fully repairing models towards 3D impress-readiness.
Advanced print training tools like PreForm software from Formlabs include an automated repair role. PreForm is free, try information technology at present.
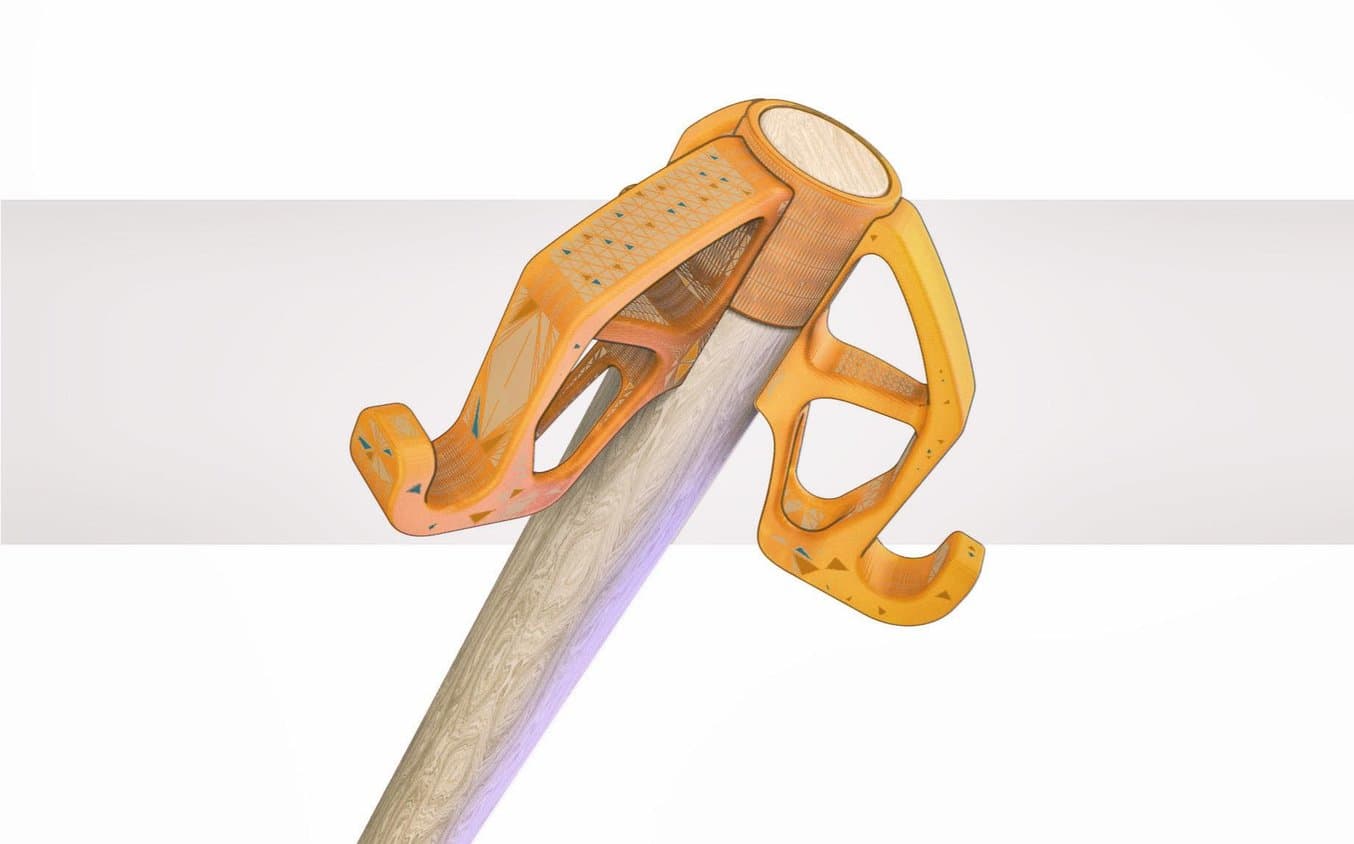
3D designers typically construct models using elaborate surfacing methods. This results in mathematically 'perfect' geometry divers by curves and splines. For 3D printing, surfaces are converted to a mesh format that describes geometry equally a cloud of connected triangular faces and vertices.
Mesh conversion is similar smashing a perfectly smooth mirror, then gluing back together all the bits and pieces to go far wait like the original. Done desperately, the result is a model with all kinds of edges, holes, and floating parts, equally well every bit areas with many intersecting triangles that do not belong at that place. Done well, the 3D impress is a manifold mesh without holes, duplicate from the original design.
A 3D model mesh with various flaws.
A typical STL file repair workflow contains the following steps:
-
Auto-repair. The STL repair software's wizard volition attempt to fix all major errors, including holes, dissever shells, and intersections.
-
Separating shells. A mesh consists of collections of connected triangles. It tin contain multiple continuous surfaces that ideally are joined together while obsolete ones demand removal.
-
Endmost holes, bridging gaps. Some comprehensive STL repair programs allow unlike ways of hole filling, such as planar, tangent, ruled, or freeform.
-
Resolving overlaps and intersections. This typically requires recalculating entire portions of the mesh.
-
Filtering out double faces, double vertices, inverted normals, and precipitous, narrow triangles.
-
Stitching open up edges and remaining holes.
-
Manual repair past deleting and creating triangles.
-
Remeshing to optimize triangle count.
-
Exporting to the chosen mesh format.
The about popular and storage-friendly format is STL (StereoLiThography), which we will use for this article. We recommend saving the .STL files in a Binary format since it further reduces file size. As described in our Meshmixer tutorial, there are several other useful formats such every bit AMF, Collada, OBJ, and PLY, with specialized qualities for storing material, color, rendering, 3D scanning, and 3D press information.
Note: Several software packages contain mesh repair functionalities, such as FreeCAD, SketchUp, 3D Studio Max, and Rhinoceros, also as online services such as Willit 3D Print, MakePrintable, 3DPrinterOS, SculptGL, and Shapeways. For Formlabs customers, PreForm print preparation software already has Autodesk Netfabb's automatic repair and role packing functions embedded to gear up 3D models upon import. This typically guarantees model integrity, so use boosted tools but when requiring more than advanced functions.
| Effectiveness | Efficiency | UI | Versatility | Remeshing | Automobile-Fixing | Acme Features | Who is it for? | Cost | |
|---|---|---|---|---|---|---|---|---|---|
| Meshmixer | ★★★★ | ★★★ | ★★★★ | ★★★★ | ★★★★★ | ★★★★ | UI, Remesh, & Machine-Set up | 3D Artists | Complimentary |
| Netfabb | ★★★ | ★★★ | ★★★ | ★★★★ | ★★★ | ★★★ | Infill & Supports | Engineers | Gratuitous (edu) |
| Magics | ★★★ | ★★★ | ★★★ | ★★★★★ | ★★★★ | ★★★ | Manual Repairs | Engineers | Paid |
| Blender | ★★★★ | ★★ | ★★ | ★★★ | ★★★★ | ★ | CG Artists | Free | |
| Meshlab | ★★ | ★ | ★ | ★★★★ | ★★★★★ | ★ | 3D Scanning | Complimentary |
Based on our explorations, the best STL repair tool is Meshmixer. Information technology combines a convenient interface with all the options needed to repair circuitous mesh errors. Its boosted possibilities and complimentary availability make it a articulate number one.
Meshmixer is also a useful tool to edit STL files, resculpt entire sections, as well as optimize and finalize 3D models. Read our tutorial with xv pro tips for editing STL files for 3D printing.
Autodesk's Netfabb distinguishes itself by being geared towards engineers with its avant-garde 3D printing preparation capabilities.
Magics is a professional STL editor solution and offers an enormous variety of STL file repair functions, yet, it oft takes more than manual repair work. Therefore Magics enters the listing in tertiary place.
While Blender is geared more towards 3D modeling and has a complex interface, it still offers most of the required functionalities for successful mesh repairs.
Lastly, Meshlab is a must-accept lightweight mesh viewer and editor that makes up for what information technology lacks in file repair capabilities and user-friendliness with its advanced remeshing scripts.
The following section puts the five STL repair tools to the test using a complex 3D model of a coat claw that has several major errors including holes, gaps, intersections, and floating triangles. The claw needs to be combined with a mounting cylinder to result in a single watertight mesh.
Read on to walk through the step-by-step repair process with the 5 all-time STL repair programs.
White Paper
This white paper provides a detailed look into how to start using 3D scanning to improve office design and production and how, paired with 3D printing, scanning technology workflows can exist effectively applied to replication and restoration, reverse technology, and metrology.
Download the White Paper
Meshmixer is a versatile and user-friendly mesh editing program. Information technology is non just possible to optimize a triangle mesh, but also to resculpt entire sections, stylize the model, or add together useful features to it.
When loading the coat claw into Meshmixer and initiating Analysis → Inspector we find that indeed, it shows all the mesh errors. Under Shaders, cull the X-ray style for better visibility. Make sure to select the right Pigsty Make full Manner before either fixing individual errors by clicking on the dot indicators or running Motorcar Repair All that in most cases does the job sufficiently.
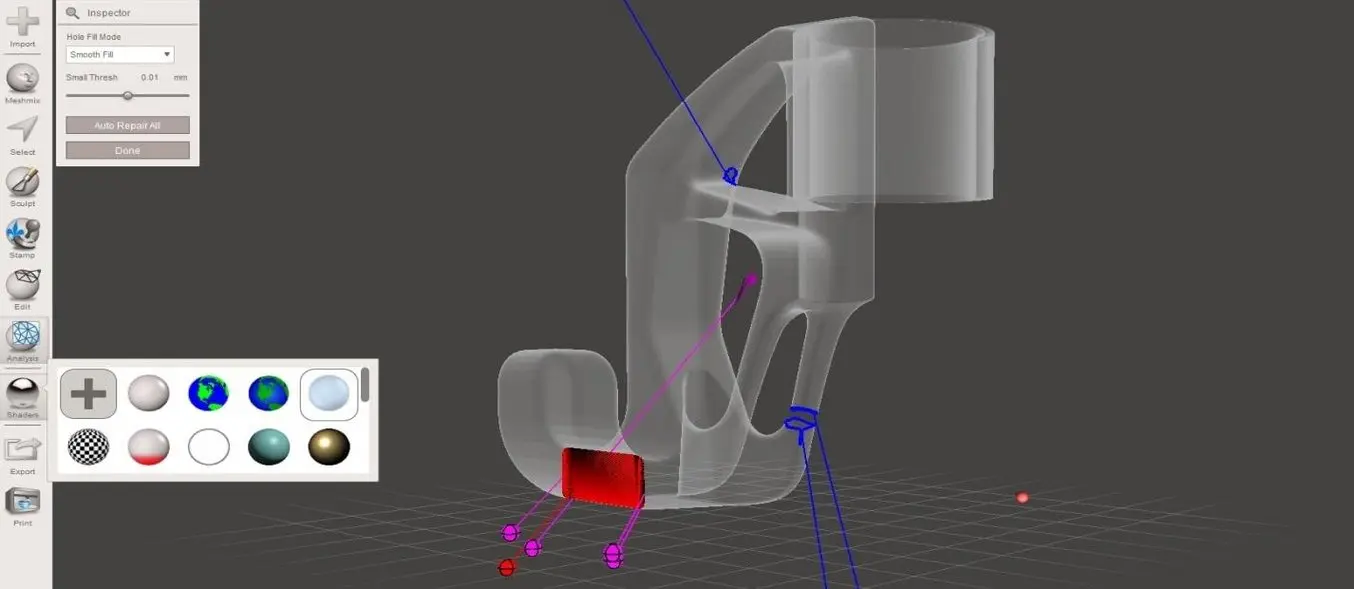
Apply the Ten-ray shader in the Inspector to view all errors.
An alternative hole repair procedure is to select the area surrounding the hole and use the Edit → Erase and Fill (F) performance from the popup menu. Setting Type to Shine MVC produces a skilful continuous fill. Edit → Make Solid or Edit → Supervene upon and Fill are other alternatives that result in a closed mesh. An additional pass with the RobustSmooth sculpting brush volition blend the improved surface area completely into the model.
In case the model consists of split up shells, go to Edit → Separate Shells and open the Object Browser (Ctrl + Shift + O). At present, progressively select ii shells at a time and hit Boolean Union from the popup window. In the newly opened submenu, Precise or Max Quality style will maintain the intersection curve betwixt both objects, while Fast Approximate is much quicker and usually suffices.
If the Boolean operation fails it results in ii ruddy colored objects. In that case, turn the Search Depth parameter up and lower the Target Edge Scale to increase the chance of success. Checking Utilise Intersection Curves also improves quality. If all else fails, moving one of the shells by a few hundredths of a millimeter in the Edit → Transform section volition practise the play a joke on.
Auto Repair All will remove floating sections and patch up all boundary loops. In this case, we desire to manually connect the gap in i of the struts. This is where the Bridge tool comes in. Information technology works all-time on direct sections and since this is a gap betwixt circular loops information technology is best patched up in sections. Choose Edit → Select and highlight the triangles on both sides to be connected. And then hitting Edit → Span (Ctrl + B) from the popup menu and set the Refine parameter high enough for a smoothen connectedness. Repeat the Bridge command for a few areas around the perimeter of the gap, then utilize the Inspector to fill up the remaining holes. A good mistake prevention practise is to employ Edit → Remesh before repairs in gild to increase and homogenize the triangulation in the area concerned.
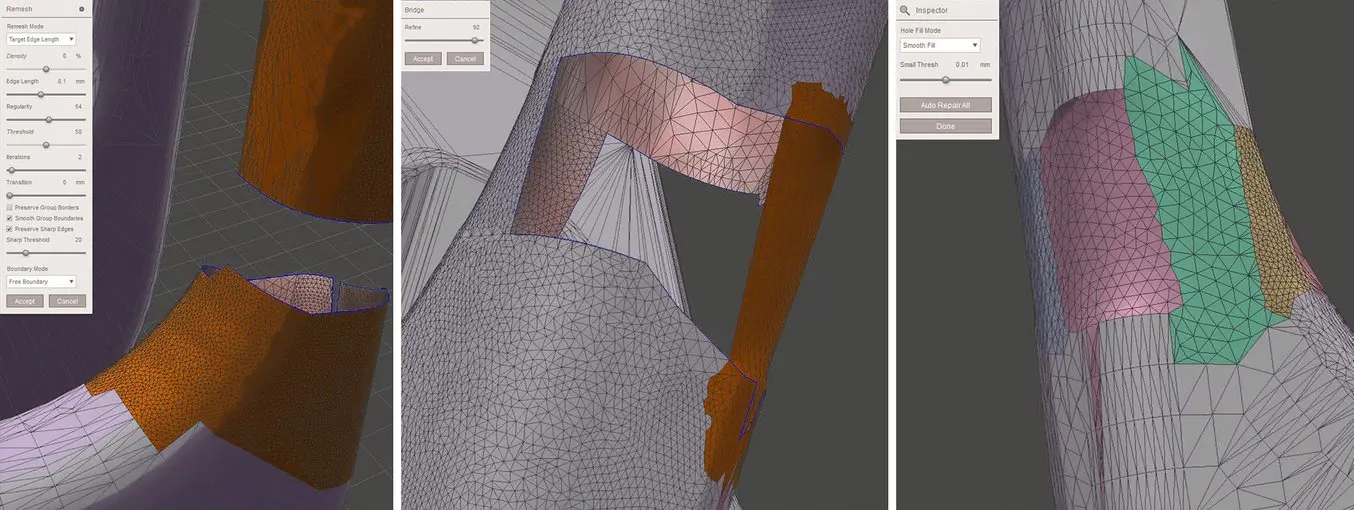
Connecting a cylindrical gap requires several bridging, remeshing and hole filling operations in Meshmixer.
Meshlab is a software suite that specializes in mesh operations related to 3D scanning data and provides many retriangulation and avant-garde repair algorithms. A useful one is Filters → Remeshing, Simplification and Construction → Simplification (Quadratic Edge Plummet Decimation) because information technology recalculates a mesh towards a target number of faces. Checking Planar Simplification will preserve flat surfaces best. An alternative triangle reduction method is Filters → Cleaning and Repairing → Merge Shut Vertices.
Floating elements can be detected by right-clicking on the part in the project window and selecting Split in Connected Components. Separate shells tin can and then be individually deleted or combined back with CSG Functioning using a Wedlock operator.
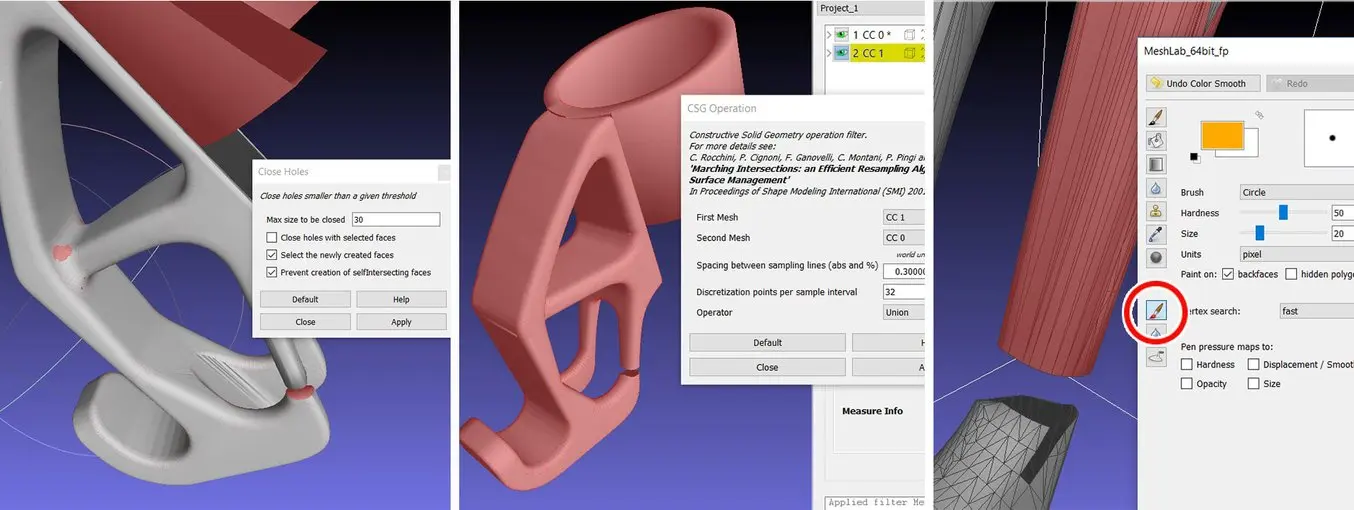
Basic repair utilities in Meshlab: Close holes, Boolean, and castor choice.
It is possible to do bones mesh repairs as well with Meshlab. For case, Filters → Cleaning and repairing → Select Self Intersecting Faces → Apply will select all intersecting triangles which can then be removed by pressing Delete. Filters → Cleaning and repairing → Remove Duplicated Faces and Remove Duplicated Vertex are always useful actions to perform. The side by side step is healing upward holes using Filters → Remeshing, Simplification and Construction → Close Holes. The Compute Geometric Measures operation nether Filters → Quality Measure and Computations will indicate when a mesh is not watertight. If not, observe the involved areas with Render → Show Non Manif Edges and Show Non Manif Vertices.
For bridging gaps, groups of triangles tin can exist deleted using the Select Faces in a Rectangular Region tool from the toolbar. Agree the Alt key to leave backfaces out of the selection, use Shift + Ctrl + D to deselect. For selecting individual triangles, click the Z-Painting tool on the toolbar and select the red castor icon. Left click to select triangles, right click to erase the selection and hitting delete to remove triangles. Because Meshlab does not implement any triangle creation functions, we reside to the surface generation method under Filters → Remeshing, Simplification and Construction → Surface Reconstruction: VCG. With a low enough setting for Voxel Side and high enough value for Geodesic Weighting and Volume Laplacian Iterations, it will upshot in a smooth manifold mesh. This method is usually recommended over Filters → Remeshing, Simplification and Construction → Screened Poisson Surface Reconstruction. Another alternative method is to generate an Alpha Complex and so generate an Alpha Shape which sometimes works with the right values. For remesh operations, Meshlab offers a voxeliser under Filters → Remeshing, Simplification and Construction → Uniform Mesh Resampling which results in a manifold mesh and offers an commencement parameter useful for creating hollow parts.
Note:Salvage meshes after every important operation! Meshlab does not take an Disengage function and will require reimporting the original mesh.
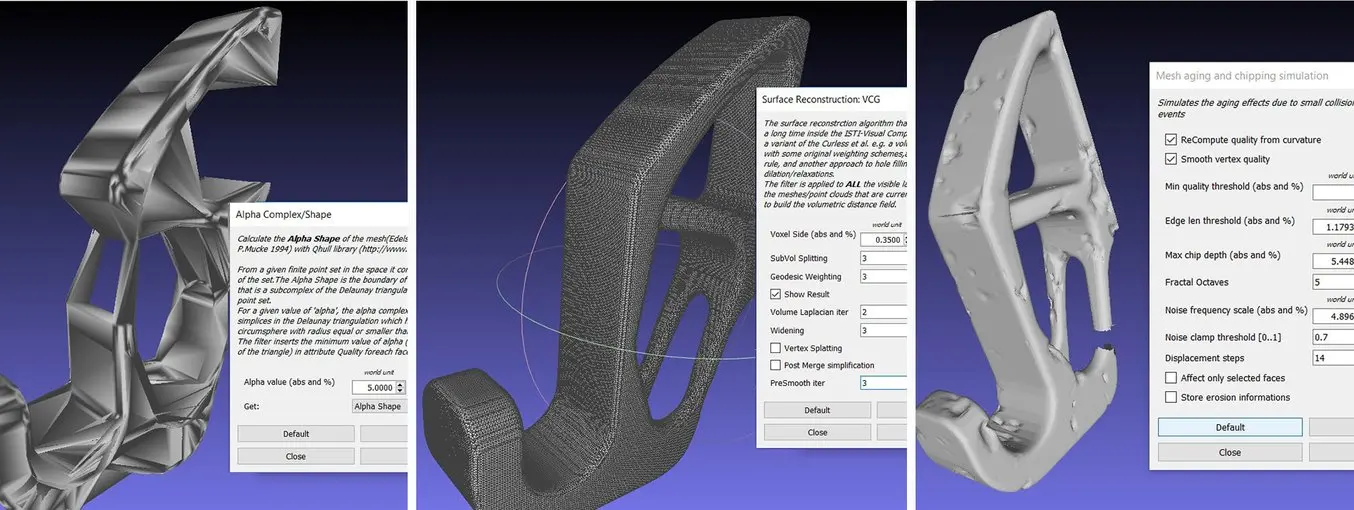
Advanced surface reconstruction functions in Meshlab, some more successful than others.
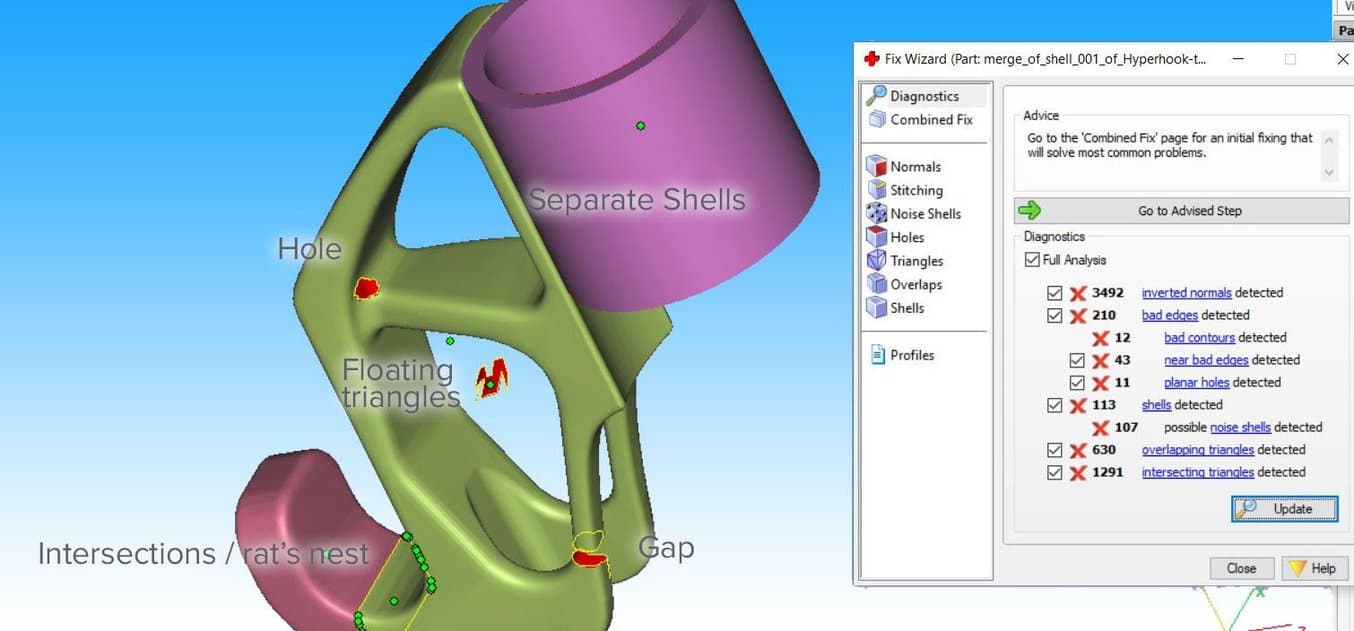
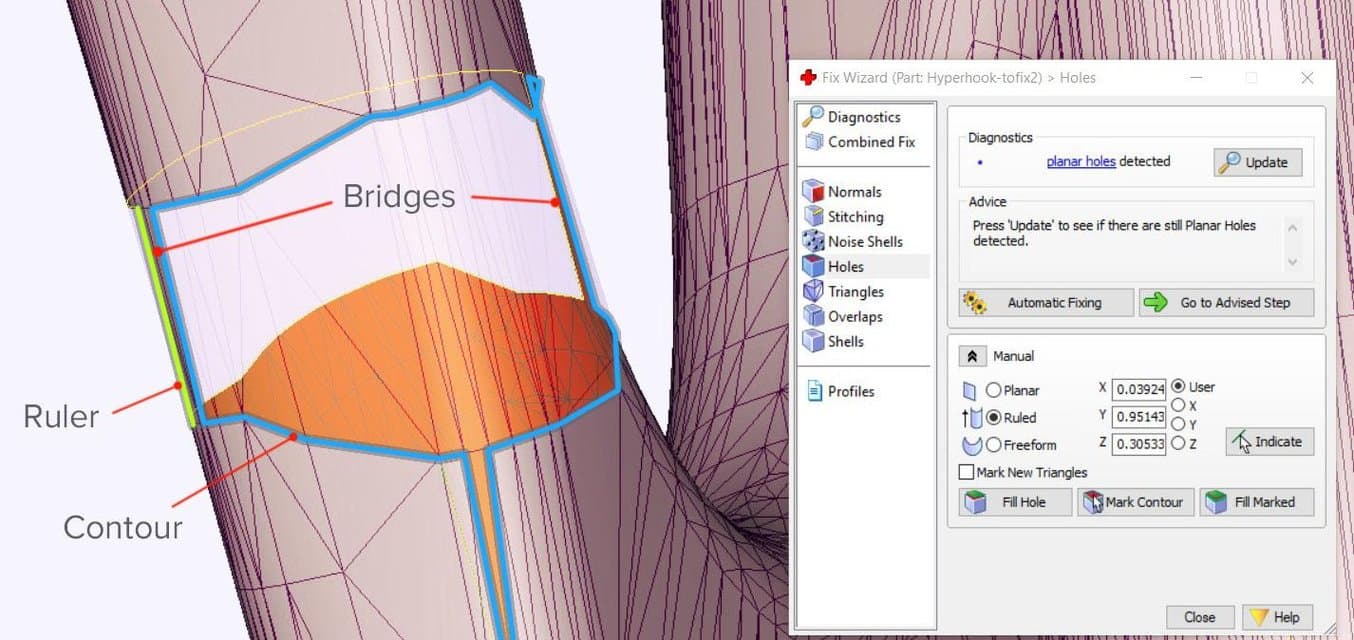
Materialise Magics is a professional person 3D print data preparation tool that allows all-encompassing manual control over meshes, including wall thickness analysis, hollowing, remeshing, smoothing, Boolean, and cutting operations, equally well as fixing holes, bad edges, and the most complicated triangle errors.
Fixing errors is typically done using the Fix Sorcerer under the ruby cross icon. Click on Get to Advised Step opens a diagnostics table to check for dissimilar errors to be repaired. For large meshes, it is recommended to uncheck Overlapping triangles and Intersecting triangles and set up the major errors commencement. After selecting Update, over again click Go to Advised Step and and so on Automatic Fixing–this will fix most errors.
In case the fix wizard fails to repair bad edges and overlapping triangles, the Run up office nether Stitching in the Ready Sorcerer menu oft proves useful with a high plenty tolerance setting. For remaining overlapping triangles, either run the Fix Wizard over again or cull Detect Overlapping from the Overlaps section in the Set up Magician menu. This selects all overlaps that will and then exist removed past hitting Delete Marked. Similarly, this can exist washed for intersecting triangles nether Triangles → Detect Intersecting. If stitching the remaining gaps does non complete the repair, the Create button now allows filling up the remaining gaps manually. Mesh sections can too manually be marked under the Mark tab on the main menu. Floating sections can be removed under the Noise Shells section. For big non-planar holes, manually filling these using the Freeform choice under Holes in the Fix Wizard menu volition result in the smoothest fill patch. The Ruled pick allows specifying a management for the hole to follow and is in this instance used to bridge the cylindrical gap in one of the flower's stamens after manually creating a few bridging triangles.
Sometimes the Fix Magician will not merge different shells in the mesh. To gear up that, correct click on the office in the Part Pages → Part List carte on the main screen and cull Shells to Parts. This creates separate meshes that when checked can at present be combined using the Tools → Boolean (Ctrl + B) function.
Advanced hole filling functions for organic and cylindrical shapes in Magics.
Blender is a free and open-source mesh creation environs, including 3D modeling, rigging, rendering, and animation. Several STL repair functions are available in Edit Mode on the Mesh menu on the lower toolbar. The CellBlender add together-on provides a Mesh Analysis tool to check manifoldness and to look for manifold errors. Earlier commencing any repair scripts, make certain to have the relevant mesh or department selected.
Mesh → Normals → Recalculate Exterior (Ctrl + N) flips whatsoever triangles with inverted normals. Check the info pane on top for results, in case quads are generated, these tin exist converted to triangles with Mesh → Faces → Triangulate Faces (Ctrl + T). Mesh → Degenerate → Dissolve removes edges and faces with no area. Remove duplicate vertices to weld edges together with Mesh → Vertices → Remove Doubles.
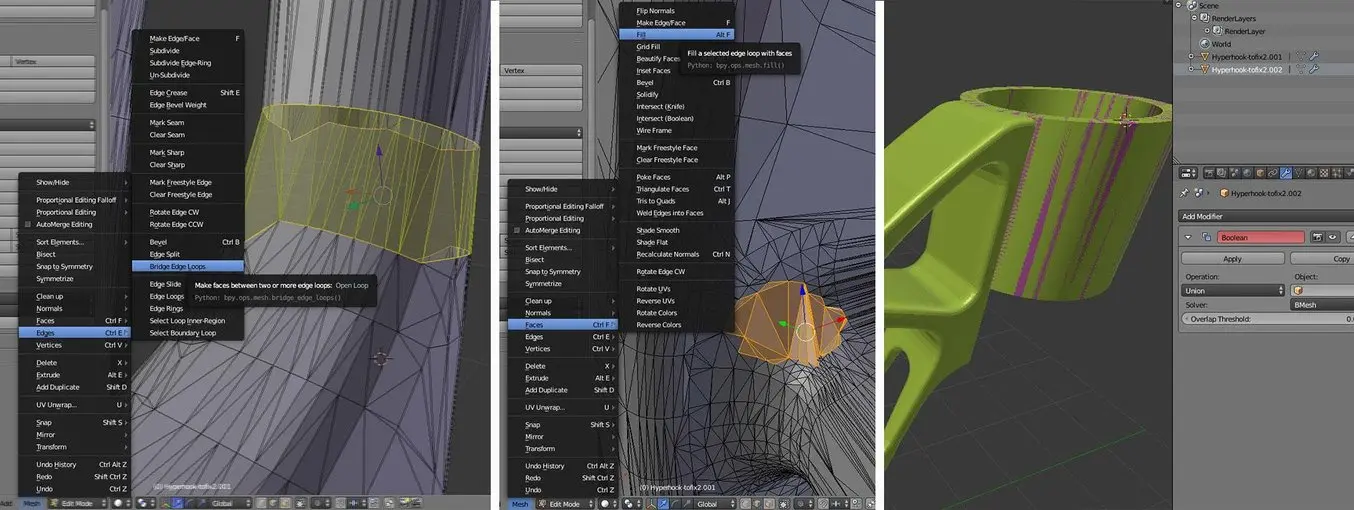
Bridging, hole filling, and Boolean functions are all represented in Blender.
The simplest way to fill a hole in Blender is to commencement select the purlieus loop with Select → Select Boundary Loop or select all non-manifold edges with Select → Select All past Trait → Non Manifold (Shift + Ctrl + Alt + M) and then hit Mesh → Faces → Make Edge/Face (F) or Mesh → Faces → Fill (Alt + F) for an improved make full. Individual triangles can be created by right-clicking an edge or vertex, Shift + right-clicking the 2d i and pressing F. It is helpful during editing to switch between Vertex Select, Confront Select, or Edge Select modes that are indicated past three icons at the bottom toolbar. Selecting a particular expanse tin can exist done with Select → Circle Select (C) which works similar to castor option. Change the brush size with the mouse wheel or the numerical plus/minus buttons, deselect belongings the Shift central. Mesh → Faces → Beautify Faces (Shift + Alt + F) sometimes works to improve mesh quality in the selected area. Private boundary loops tin can exist selected using Alt + Right click. With 2 open up boundary loops selected, choose Mesh → Edges → Bridge Edge Loops and the two areas volition be smoothly continued.
Choosing Mesh → Vertices → Separate → By loose parts will create ane object per shell in the projection browser. This makes it possible to delete unwanted mesh objects. Separate shells can be joined together with a Boolean Modifier. If all else fails, implement a Remesh Modifier and increase the octree depth to effectually 8 or until results are satisfactory. For increasing wall thickness in certain areas, go to Sculpt Mode and utilise the Inflate brush from the lower menu Brush → Sculpt Tool.
Autodesk Netfabb is an advanced 3D impress file training tool and its automated repair part is embedded in software such as Formlabs Preform. It is offered in a Standard, Premium and Ultimate version of which the first two are freely available for educational utilise.
Netfabb offers boosted mesh editing procedures such every bit hollowing, custom support edifice, and the Lattice Assistant and Lattice Commander which are great aids in developing lightweight parts. The Ultimate version offers an Optimization Utility that structurally optimizes parts based on practical loads using FEA analysis.
With the File → Import CAD File as Mesh role it is possible not only to import mesh models in various formats, but also native files from Catia, Siemens NX, SolidWorks, SolidEdge, Rhinoceros, ProE, Sketchup plus back up for STEP, IGES, SAT, and Parasolid XT files. To import a mesh click File → Add together office and bank check Extended Repair in the dialog. This resolves most errors resulting in a 3D printable file.
Before starting the repair job information technology is useful to analyze parts. Under the Assay icon in the taskbar or afterwards right click on the part under Parts → Analyse → New Analysis → Add part it is possible to rapidly bank check wall thickness. Correct-click the part then choose Analyse → New Measurement or pick the ruler icon from the taskbar which allows linear, radius, angular, and wall thickness measurements at specific points.
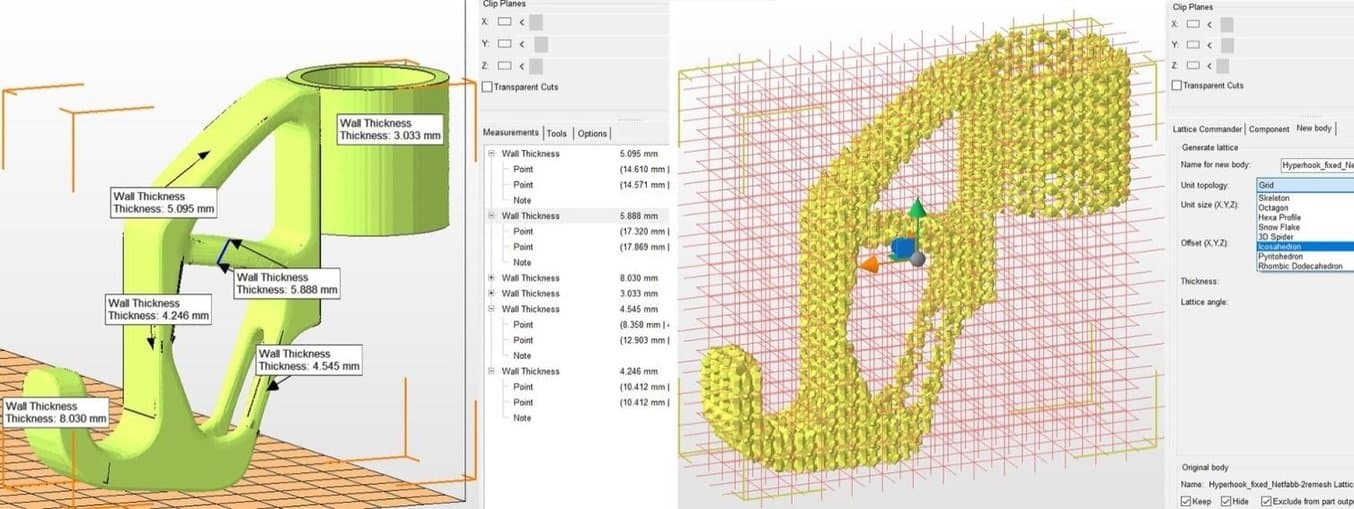
Advanced Netfabb functions: wall thickness analysis and lattice structures.
Open up the Part Repair section past clicking the reddish Repair icon from the taskbar. If the automated repair script did its task well upon import, the Mesh is Closed and Mesh is Oriented items in the Condition tab should exist checked in green. In the Actions tab, it is possible to further optimize the file in case intersections pertain to be. Nether Self Intersections, choose Detect and then either opt for Trivial which does a default hole repair, Run up Triangles, Remove Double Triangles, Remove Degenerate Faces, or Split Off and so Remove the intersections. Wrap Part Surface works similar to voxelisation procedures and leaves just a manifold outer peel. Too, brand certain that no noise shells exist under the Shells tab.
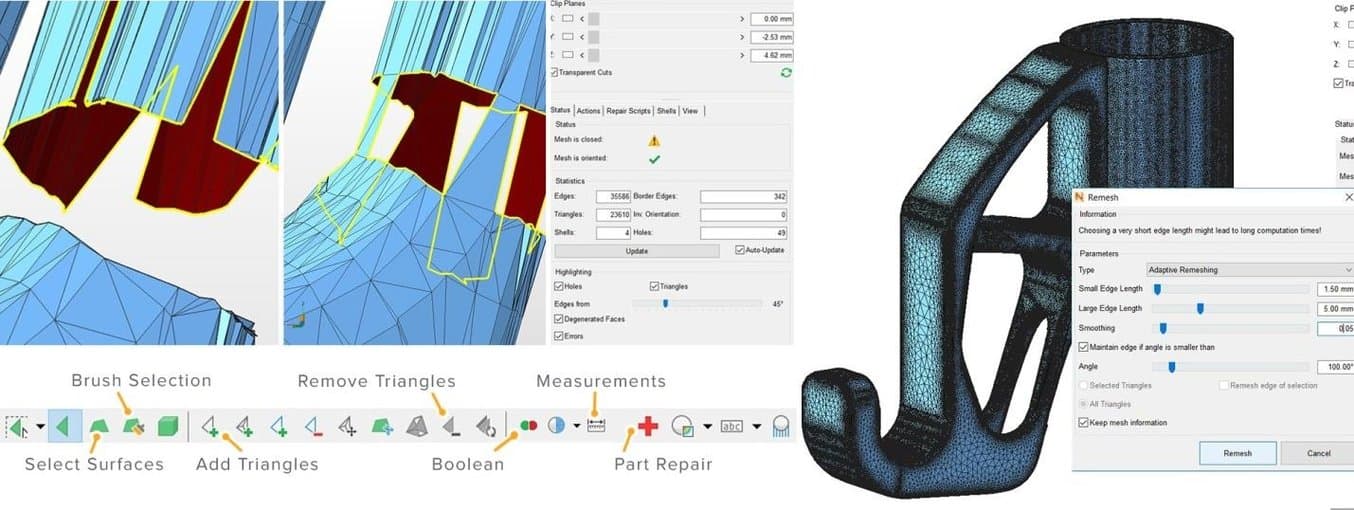
Netfabb offers a advanced STL repair capabilities.
When attempting to bridge gaps, Netfabb will rather fill up the open holes which require further manual repairs. Tap the Select Surfaces icon on the main toolbar and select the entire hole, then hit Delete. Alternatively, use the Brush Selection tool and use Ctrl + Scrollwheel and the Plus/Minus buttons to change castor size and selection. With the triangles selected, choose the Remove Selected Triangles icon and manually add together missing triangles equally well as a few bridging triangles with the Add Triangles push button. The Repair → Shut all Holes operation will complete the mesh repair task. Finally, nosotros can opt to refine the mesh using the Mesh Edit → Remesh command which recomputes the model based on a Target Edge Length parameter. Check the Maintain Edge option to optimize model integrity effectually sharp edges.

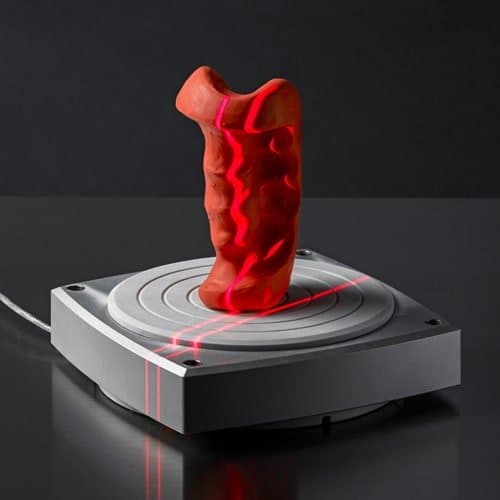
Looking for the right tool to turn your designs into reality? High-resolution desktop stereolithography (SLA) 3D printers are fast and toll-effective tools to produce loftier detail models with a smooth surface finish.
Learn more about SLA 3D printers and see the quality firsthand by requesting a gratis sample part printed on a Formlabs SLA 3D printer.

Source: https://formlabs.com/blog/best-stl-file-repair-software-tools/
Posted by: wilsonhimattim.blogspot.com
0 Response to "How To Repair Split Pedestals Table"
Post a Comment